

Is your laptop making strange noises or overheating? Dust accumulation can affect the performance of your laptop and even cause it to overheat. But don’t worry; we’ve got you covered with a step-by-step process to clean your laptop fan without dismantling the entire device. From necessary tools to alternative methods, we’ll guide you through cleaning. And if you’re feeling brave, we’ll also provide a detailed guide on dismantling and cleaning the laptop fan for a thorough cleaning. So grab your cleaning supplies and prepare to improve your laptop’s performance!
How Dust Affects Laptop Performance?
Dust accumulation in a laptop can have a significant impact on its performance. When dust builds up, the laptop fan becomes noisy and less efficient. Moreover, the dust can clog air vents and hinder proper airflow, resulting in thermal throttling and overheating. Regular cleaning of the laptop fan and cooling system is crucial to improve performance and extend the device’s lifespan. Maintaining proper airflow and preventing excessive heat can prevent potential hardware damage and ensure peak performance.
Necessary Tools for Laptop Fan Cleaning
Gathering the necessary tools is important before you start cleaning your laptop fan. Here are the items you’ll need for a basic cleaning:
- Compressed air canister: This will help remove dust and debris from the laptop fan and other components.
- Soft-bristled brush: Use a small brush to gently dislodge any stubborn dust particles from the fan blades and vents.
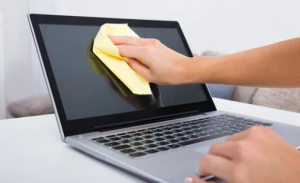
- Microfiber cloth: A microfiber cloth is ideal for wiping down your laptop’s exterior after cleaning.
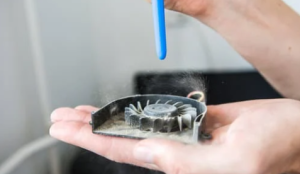
- Isopropyl alcohol: For deeper cleaning, you can use isopropyl alcohol to remove any greasy residue or stubborn stains on the laptop’s exterior and fan blades. Make sure to use a cloth dampened with alcohol rather than applying it directly to the laptop.
How to Clean Laptop Fan? – Step-by-Step Process
To clean your laptop fan, turn it off and unplug it. Locate the fan vent on the side or bottom, and use compressed air to blow out any dust or debris. For stubborn dirt or grime, gently brush or swab with rubbing alcohol.
Cleaning the Laptop Fan without Dismantling the Laptop

To clean your laptop fan without dismantling the laptop, you will need a few essential tools. Gather compressed air and a soft brush to remove dust and debris from the vents and fan intake/exhaust areas.
Using Compressed Air for Cleaning
Cleaning the laptop fan is crucial to prevent overheating and maintain optimal performance. Compressed air is a popular method for cleaning laptop fans without dismantling the laptop. First, ensure the laptop is shut down and disconnected from any power source.
Locate the vents where the fan is located, usually on the sides or bottom of the laptop. Hold the can of compressed air upright and use short bursts of air to blow out any dust or debris from the vents. Be cautious not to hold the can too close or tilt it, as this can cause liquid to come out instead of air.
Alternative Methods to Compressed Air
If you don’t have access to compressed air, alternative methods exist for cleaning your laptop fan. One option is using a vacuum cleaner with a brush attachment. Hold the brush near the fan and carefully suck out dust or debris.
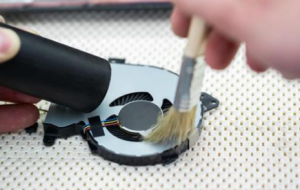
Another method is using a soft brush, like a small paintbrush or toothbrush, to sweep away dust from the fan gently. You can also use a can of compressed air designed for electronics which provides a focused burst of air. Remember to be gentle to avoid damaging the delicate components inside your laptop.
Detailed Guide to Dismantle and Clean the Laptop Fan
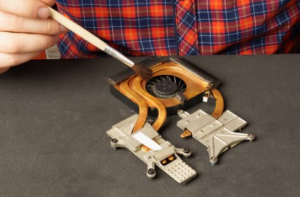
Regularly cleaning your laptop fan ensures optimal performance and prevents overheating. To effectively dismantle and clean the laptop fan, follow these step-by-step instructions. First, gather the necessary tools, such as a screwdriver and a can of compressed air. Safely remove the bottom panel of your laptop and locate the fan.
Use short bursts of air to blow away the dust and debris from the fan blades and vents. Take precautions to avoid any damage to the internal components of your laptop. Keeping your laptop fan clean will help maintain its cooling system and prolong its lifespan.
Preparatory Steps Before Dismantling
Before dismantling the laptop fan, it is crucial to take some preparatory steps. Turn off your laptop and unplug it from any power source to avoid accidents or damage. Additionally, an anti-static wrist strap can prevent any potential harm caused by static electricity. Gather all the necessary tools, such as a screwdriver and compressed air, and find a clean and well-lit workspace to ensure comfort and visibility.
Prepare a small container or tray to hold the screws and small parts you remove during disassembly. Lastly, taking photos or making notes of the disassembly process can be helpful when it comes to reassembling the laptop later on.
Safely Exposing the Internal Fan
Cleaning the laptop fan regularly ensures optimal performance and prevents overheating. Safely exposing the internal fan requires proper shutdown and disconnection of the laptop from any power sources. Carefully remove the screws securing the bottom access panel using a small screwdriver.
Once removed, you can expose the internal components, including the fan. Gently remove dust and debris from the fan blades and surrounding areas using compressed air or a soft brush. For stubborn dirt or grime, a cotton swab dipped in rubbing alcohol can be used.
Cleaning the Fan and Surrounding Areas
Cleaning the laptop fan and surrounding areas is crucial to maintain optimal performance and prevent overheating. Start by shutting down the laptop and disconnecting it from any power source, and use a small screwdriver to remove the screws securing the access panel on the bottom of the laptop.
Carefully lift off the access panel to expose the internal components, including the fan. Use compressed air or a can of compressed air to blow out any dust or debris from the fan blades and surrounding areas. Stubborn dirt or grime can be gently cleaned using a soft brush or cotton swabs dipped in rubbing alcohol.
Reassembling the Laptop Post Cleaning
After cleaning, it is important to carefully reassemble all the removed components. Take the time to reconnect any cables or wires disconnected during the cleaning process. Once everything is properly connected, place the laptop back in its original position and secure any screws or fasteners that were removed.
Before turning on the laptop, double-check that all connections are secure and nothing is loose. Once everything is reassembled, turn on the laptop and listen for any unusual noises or vibrations from the fan. If everything sounds normal, you have successfully cleaned and reassembled your laptop fan.
How Often Should You Clean Your Laptop Fan?
It is recommended to clean your laptop fan every 3-6 months to prevent overheating and extend its lifespan. However, if you notice excessive dust buildup or your laptop running hot, more frequent cleaning may be necessary. Consult the manufacturer’s guidelines or a computer technician for further guidance.
What If the Fan Noise Persists After Cleaning?
If the fan noise persists even after cleaning, it could indicate a deeper issue with your laptop. Check for any loose or damaged components that may be causing the noise. Replacing the fan or other internal components may be required to resolve the noise problem.
Conclusion
Regularly cleaning your laptop fan is crucial for maintaining optimal performance and preventing overheating. Dust accumulation can hinder the fan’s ability to cool the internal components, leading to decreased performance and potential damage. By following our step-by-step guide, you can effectively clean your laptop fan without the need to dismantle it.
However, if you encounter persistent fan noise or want a more thorough cleaning, we also provide a detailed guide on dismantling and cleaning the laptop fan. Remember, regular maintenance is key to prolonging the lifespan of your laptop. So, don’t wait any longer – grab your necessary tools and start cleaning your laptop fan today!
FAQ – How to Clean Laptop Fan?
Can you vacuum laptop fan?
Vacuuming the laptop fan is generally not recommended due to the potential for creating static electricity that can damage sensitive electronic components. Instead, use compressed air or a soft brush to remove dust and debris. Always refer to the manufacturer’s guidelines or seek professional help if you need help.
Is it safe to clean your laptop fan yourself?
Yes, it is generally safe to clean your laptop fan yourself. Use compressed air or a soft brush to remove dust and debris from the fan. If you need more clarification, consult a professional for laptop maintenance.
Can I clean my laptop fan with a hair dryer?
Using a hair dryer to clean your laptop fan is not recommended. It can generate static electricity and potentially damage delicate components. It’s best to use compressed air or a soft brush instead. If unsure, consult a professional technician for safe and effective cleaning.
Should I open my laptop to clean it?
Opening your laptop to clean the fan should only be done if you have experience and are comfortable with computer hardware. If not, seek professional assistance. Cleaning without opening can still work using compressed air or a vacuum cleaner. Follow safety precautions and consult a specific guide for your laptop model.
Why is my laptop fan so loud all of a sudden?
A sudden increase in laptop fan noise can indicate overheating, often caused by dust and debris accumulating in the fan. Check for heavy CPU usage from background processes or applications. Clean the fan using compressed air or seek professional help if the issue persists.


